Blog with NextAuth & Prisma (PostgreSQL)
Mohanad Alrwaihy
April 24, 2023
167
1
In this post we are going to create a Simple Blog Post project using NextAuth and PostgreSQL database with Prisma 💐
11 min read
What is NextAuth?
NextAuth is one of the best tools to handle Authentication when using Next.js to create Websites. It's easy to use and offers Adaptations to many database options to save users and persist sessions.
NextAuth Providers
- OAuth Providers - (GitHub, Twitter, Google, etc...).
- Custom OAuth Provider.
- Using Email - Magic Links
- Using Credentials - Username and Password or any arbitrary credentials.
NextAuth Features
- Security 🔒 - NextAuth Promotes No Password Methods.
- Cross-Site Request Forgery Tokens (CSRF) on POST routes (Sign in, Sign Out).
- Cookie Policies aim for the most restrictive policy.
- JSON Web Tokens (JWT) encrypted with A256GCM.
Read More about NextAuth Here.
NextAuth support two Strategies for user Session JWTs and Database Session.
JSON Web Tokens (JWTs) VS Database Session
NextAuth uses JSON Web Tokens (JWTs) by default to save the user's session. While using a Database Session when using NextAuth with a database Adapter.
I have a blog post talking about JWTs and Database Sessions if you want to learn more about it Click Here.
Prisma
What is Prisma?
Prisma is an ORM (Object Relation Mapping) that makes working with databases an easy task because of the ability to create models in a clean way and migrated the models to the database, type safety, and auto-completion.
Prisma Schema
The Prisma schema is intuitive and lets you declare your database tables in a human-readable way — making your data modeling experience a delight. You define your models by hand or introspect them from an existing database.
Prisma Databases
These are the supported database:
- PostgreSQL
- MySQL
- SQLite
- SQL Server
- MongoDB
- CockroachDB
Blog Project
We are going to create a simple Blog application with NextAuth and Prisma using NextAuth Google OAuth Provider.
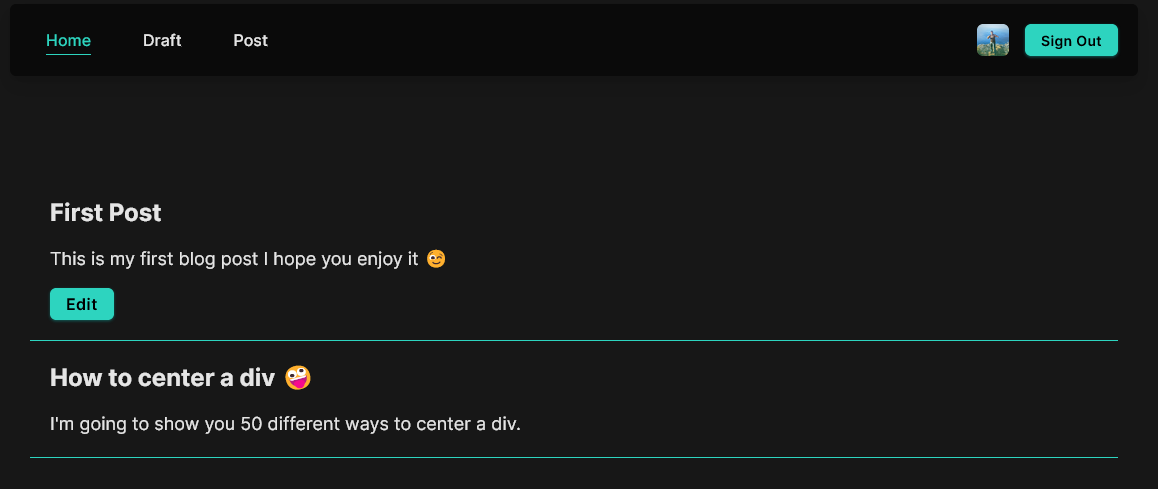
This is the final look of the project 👇
Create NextJS Application
POWERSHELLnpx create create-next-app@latestI'm going to name the application prisma_blog and check these options:
- TypeScript ✅
- TailwindCSS ✅
- ESlint ✅
Setup Adjustments
After the installation is complete I'm going to clean index.tsx and globals.css files:
index.tsxTSX/* index.tsx */
export default function Home() {
return (
<div>
<h1>Hello World</h1>
</div>
)
}globals.cssCSS/* globals.css */
@tailwind base;
@tailwind components;
@tailwind utilities;
@layer components {
.btn {
@apply py-1 px-4 shadow-sm hover:shadow-md transition-all font-semibold rounded-md outline-none border-none ring-offset-2 ring-offset-neutral-950 tracking-wide focus-visible:ring-2 focus:scale-95 disabled:cursor-not-allowed disabled:opacity-75 disabled:shadow-none bg-teal-400 shadow-teal-800 hover:bg-teal-500 hover:shadow-teal-800 text-black ring-teal-400 disabled:hover:bg-teal-400;
}
.btn-red {
@apply bg-red-400 shadow-red-800 hover:bg-red-500 hover:shadow-red-800 text-black ring-red-400 disabled:hover:bg-red-400;
}Adding Layout.tsx component which renders the Nav.tsx and the children in the _app.tsx file:
Layout.tsxTSX// Layout.tsx
import React from 'react'
import { Inter } from 'next/font/google'
const inter = Inter({ subsets: ['latin'] })
export default function Layout({ children }: { children: React.ReactNode }) {
return (
<div
className={`flex min-h-screen flex-col items-start p-3 max-w-6xl mx-auto ${inter.className}`}
>
<Nav />
{children}
</div>
)
}_app.tsxTSX// _app.tsx
import Layout from '@/components/Layout'
import '@/styles/globals.css'
import type { AppProps } from 'next/app'
export default function App({ Component, pageProps }: AppProps) {
return (
<Layout>
<Head>
<title>Prisma Blog</title>
</Head>
<Component {...pageProps} />
</Layout>
)
}This is the basic setup of our application. Any additional will be found in the Repository.
Pages 📃
There will be 3 Pages:
- Home -
./pages/index.tsx - Draft -
./pages/draft.tsx - Post -
./pages/post.tsx
Add NextAuth
We are going to follow the Getting Started in NextAuth documentation
Start by installing next-auth
POWERSHELLnpm install next-auth
Add NextAuth API Route
pages/api/auth/[...nextauth].tsTSX/* pages/api/auth/[...nextauth].ts */
import NextAuth from "next-auth"
import GoogleProvider from "next-auth/providers/google"
export const authOptions = {
// Configure one or more authentication providers
providers: [
GoogleProvider({
clientId: process.env.GOOGLE_ID || '',
clientSecret: process.env.GOOGLE_SECRET || '',
}),
// ...add more providers here
],
}
export default NextAuth(authOptions)Add Google ID & Google Secret
We need to get GOOGLE_ID and GOOGLE_SECRET. To get this we need to head to Google Cloud Console and create a new Project.
 Tip
Tip
If you don't have Google Cloud account you can create one for free you have to add payment method to create the account but you won't be charge anything if if you know what you are doing 🙂 (Be careful to not use any services until you read the service charges) for our case we are going to add OAuth 2.0 which is free to use.
To create a new project you can type Create a project in the top search bar and select the first option:
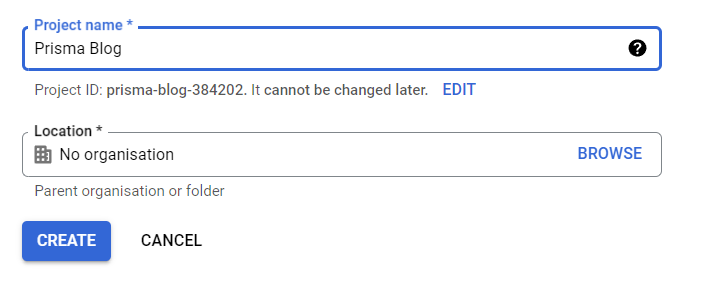
Choose a name for your project and press Create:
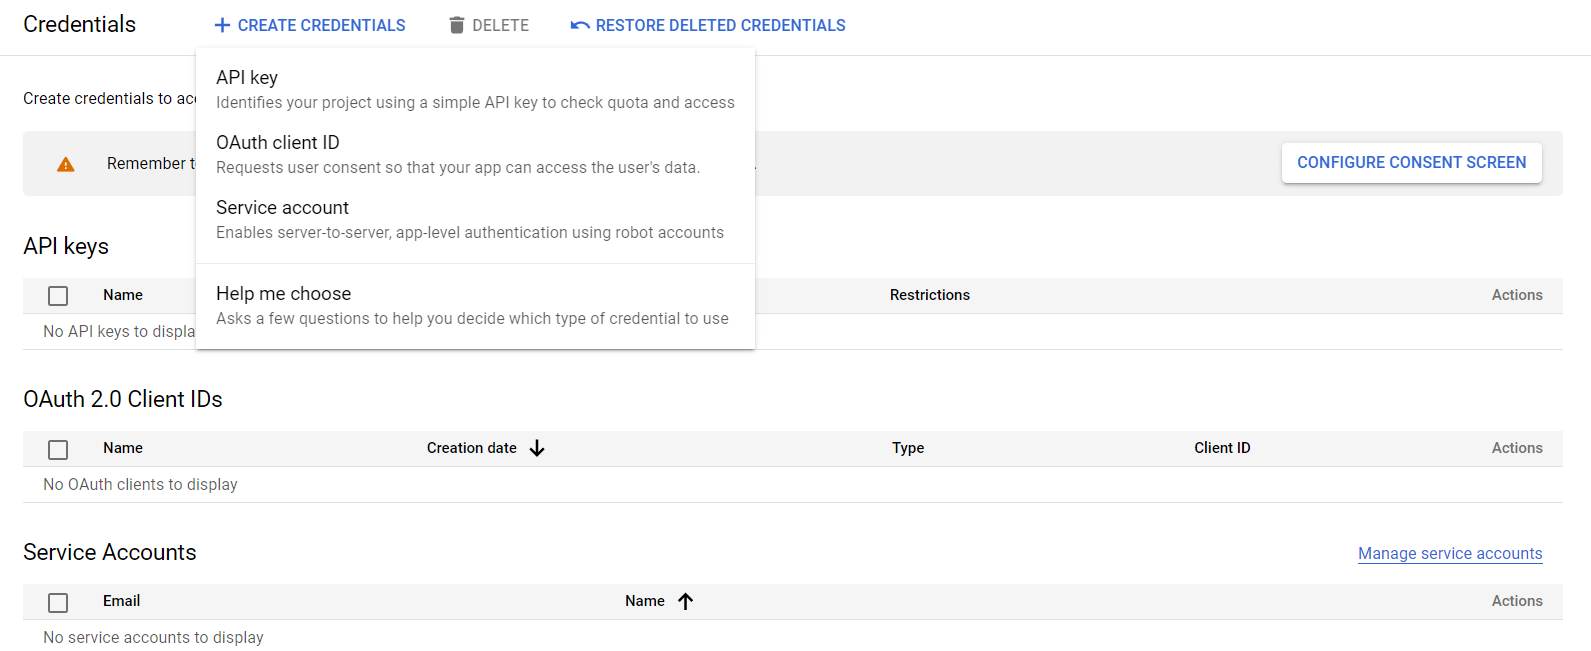
Type OAuth and choose Credentials:
in the top click Create Credentials then OAuth client ID:
You have to configure your consent screen first you can follow in this order:
- Configure consent screen.
- User type - External
- Create
Now we have to add the App Information 👇
- App name - Prisma Blog
- User support email - ANY EMAIL
- Developer contact information - YOUR EMAIL & ANY
- Save and Continue
Once we Configure consent screen go back to Credentials and then OAuth client ID.
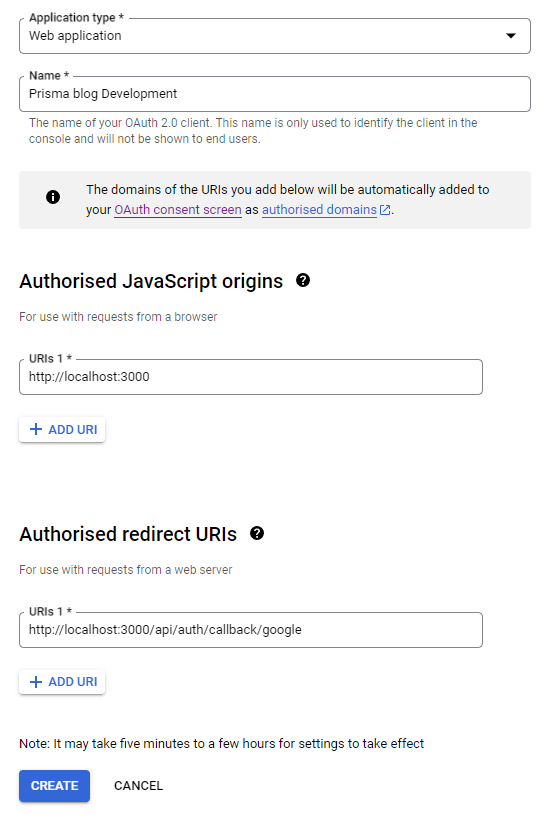
This is an example of how to fill the required fields 👇
- Application Type - Web application.
- Name - You can put any name here and you can create multiple OAuth credentials for different environments.
- Authorised JavaScript Origins - The Origin URL for development will be http://localhost:3000 put make sure to add your actual domain in production.
- Authorised redirect URIs - With NextAuth it will be the base URL followed by
BASE_URL/api/auth/callback/provider, in this case, the provider is Google. - CREATE!
- Once created you will see the Client ID and Client Secret that we want to use in our application👍
Add Session Provider & useSession
SessionProvider 👇
_app.tsxTSX// _app.tsx
import Layout from '@/components/Layout'
import '@/styles/globals.css'
import type { AppProps } from 'next/app'
import { SessionProvider } from 'next-auth/react'
export default function App({ Component, pageProps }: AppProps) {
return (
<SessionProvider session={pageProps.session}>
<Layout>
<Head>
<title>Prisma Blog</title>
</Head>
<Component {...pageProps} />
</Layout>
</SessionProvider>
)
}In the Nav bar, we are going to use useSession to Sign In, Sign Out, and Display Session information 👇
Nav.tsxTSX/* Nav.tsx */
import { signIn, signOut, useSession } from 'next-auth/react'
import Link from 'next/link'
import { useRouter } from 'next/router'
import Button from './ui/Button'
export default function Nav() {
const { data: session } = useSession()
const asPath = useRouter().asPath
function cn(...classes: string[]) {
return classes.filter(Boolean).join(' ')
}
const navigation = [
{ title: 'Home', href: '/' },
{ title: 'Draft', href: '/draft' },
{ title: 'Post', href: '/post' },
]
return (
<nav className='p-5 mb-20 rounded-md shadow-lg bg-neutral-950 text-neutral-200 w-full'>
<ul className='flex items-center gap-5 font-medium'>
{navigation.map(({ title, href }) => (
<li key={title}>
<Link
className={cn(
'py-2 px-4 rounded-lg',
asPath === href
? 'text-teal-400 underline underline-offset-8 cursor-default'
: 'hover:underline underline-offset-4'
)}
href={href}
>
{title}
</Link>
</li>
))}
<li className='ml-auto flex gap-2 text-sm'>
{!session ? (
<button className='btn' onClick={() => signIn('google')}>
Sign in
</button>
) : (
<>
<img
src={session.user?.image || ''}
alt={session.user?.name || 'User Avatar'}
className='w-8 h-8 rounded-md cursor-pointer hover:ring ring-teal-400 mr-2'
/>
<button className='btn' onClick={() => signOut()}>
Sign Out
</button>
</>
)}
</li>
</ul>
</nav>
)
}Now we can Sign In with Google and Sign Out and read current user information!
Add Prisma
Start by installing prisma:
POWERSHELLnpm install prismaInitialize Prisma with:
POWERSHELLnpx prisma initThis will create a prisma folder with schema.prisma file 👇
./prisma/schema.prismaTSX/* ./prisma/schema.prisma */
generator client {
provider = "prisma-client-js"
}
datasource db {
provider = "postgresql"
url = env("DATABASE_URL")
}Also it created an env file with a Connection String for the database called DATABASE_URL.
PostgreSQL Database
You can use any database supported by Prisma
I'm going to create a local PostgreSQL database called prisma_blog with psql 👇
POWERSHELL# Connect to the database with postgres username 👇
psql -U postgres
# Create database called prisma_blog 👇
create database prisma_blog;We need the Connection String so we can use this specific database with Prisma 👇
POWERSHELL# Connection String Example 👇
postgres://YourUserName:YourPassword@YourHostname:5432/YourDatabaseName
# To connect to locale prisma_blog database
# I'm NOT USING a password but make sure you included if necessary
postgresql://postgres@localhost:5432/prisma_blogNow we can replace the existing connection string under the environment variable DATABASE_URL to the correct one.
.envPOWERSHELL# .env
DATABASE_URL="postgresql://postgres@localhost:5432/prisma_blog"Prisma Adapter to NextAuth
Start by installing the Prisma Adapter @next-auth/prisma-adapter:
POWERSHELLnpm install @next-auth/prisma-adapterAdd the Prisma Adapter to [...nextauth].ts:
[...nextauth].tsTSX...
import { PrismaClient } from '@prisma/client'
import { PrismaAdapter } from '@next-auth/prisma-adapter'
const prisma = new PrismaClient()
export const authOptions = {
adapter: PrismaAdapter(prisma),
...
}Prisma models
There are two main benefits of Prisma models:
- Represent the actual tables in the database (PostgreSQL).
- Add the foundation for the generated Prisma Client API (Used to communicate with the database.)
We have to add several models to hook our database with NextAuth and to add posts later on.
All necessary models:
./prisma/schema.prismaTSX/* ./prisma/schema.prisma */
...
model User {
id String @id @default(cuid())
name String?
username String?
password String?
email String @unique
emailVerified DateTime?
image String?
accounts Account[]
sessions Session[]
posts Post[]
}
model VerificationToken {
identifier String
token String @unique
expires DateTime
@@unique([identifier, token])
}
model Account {
id String @id @default(cuid())
userId String
type String
provider String
providerAccountId String
refresh_token String? @db.Text
access_token String? @db.Text
expires_at Int?
token_type String?
scope String?
id_token String? @db.Text
session_state String?
user User @relation(fields: [userId], references: [id], onDelete: Cascade)
@@unique([provider, providerAccountId])
}
model Session {
id String @id @default(cuid())
sessionToken String @unique
userId String
expires DateTime
user User @relation(fields: [userId], references: [id], onDelete: Cascade)
}
model Post {
id Int @id @default(autoincrement())
title String
content String?
published Boolean @default(false)
author User @relation(fields: [authorId], references: [id])
authorId String
}We have several models created here each of them is useful with our session and creating Posts:
- User - This table is used to save new user information with a unique Id, other user credentials if available, and posts created by this user (user can have multiple posts)
- Verification Token
- Account - Used to save the different types of account users signed up within your application whether it is a credentials account (Username, Password) or an OAuth account (Google, GitHub, etc.)
- Session - Table for all the current sessions used with users in your application with their unique id, expiry time, user id, and Session Token that is used by users to persist the session in the application and request from the database.
- Post - This table is for required information for the post like title, author, and the post content.
Migrate Prisma Models
With Prisma Migrate we can create the actual PostgreSQL tables according to the models created above.
Generate Prisma Migrate:
POWERSHELLnpx prisma migrate dev- Enter
initfor the name of the Migration to clarify that this is the first database migration.
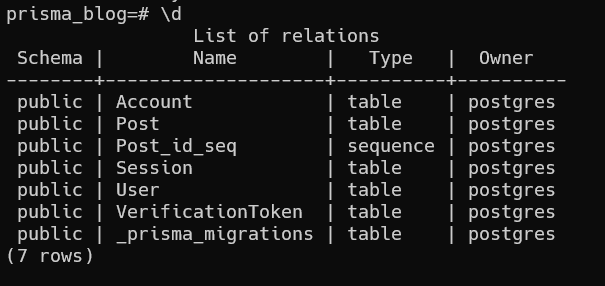
You can check your database with PSQL:
pages/api/auth/[...nextauth].tsTSX/* pages/api/auth/[...nextauth].ts */
import NextAuth from "next-auth"
import GoogleProvider from "next-auth/providers/google"
export const authOptions = {
// Configure one or more authentication providers
providers: [
GoogleProvider({
clientId: process.env.GOOGLE_ID || '',
clientSecret: process.env.GOOGLE_SECRET || '',
}),
// ...add more providers here
],
}
export default NextAuth(authOptions)You will also see a new folder under the prisma folder called Migration which has the SQL code for all the migrations you have done in your project.
Prisma Client
Create a new file inside prisma folder with the name client.ts:
./prisma/client.tsTSX/* ./prisma/client.ts */
import { PrismaClient } from '@prisma/client'
// PrismaClient is attached to the `global` object in development to prevent
// exhausting your database connection limit.
//
// Learn more:
// https://pris.ly/d/help/next-js-best-practices
const globalForPrisma = global as unknown as { prisma: PrismaClient }
export const prisma = globalForPrisma.prisma || new PrismaClient()
if (process.env.NODE_ENV !== 'production') globalForPrisma.prisma = prisma
export default prismaThis is used to prevent exhausting the connection limit to the database.
Prisma Studio
Use this command to run Prisma Studio:
POWERSHELLnpx prisma studioNow if you Sign In with Google you will see a new user appearing in the database!
API Route & Pages
Post API Route
To interact with PostgreSQL database using Prisma we can fetch data with getStaticProps, getServerSideProps, or using API Routes.
In this tutorial, I'm going to use a mix of getServerSideProps and API Routes.
Be careful not to fetch data from your API route in getServerSideProps as it may lead to server errors in production.Create Post API Route with this code:
./api/post/index.tsTSX/* ./api/post/index.ts */
import type { NextApiRequest, NextApiResponse } from 'next'
import { prisma } from './../../../prisma/client'
import { getServerSession } from 'next-auth'
import { authOptions } from '../auth/[...nextauth]'
export default async function handler(
req: NextApiRequest,
res: NextApiResponse
) {
if (req.method === 'GET') {}
if (req.method === 'POST') {}
if (req.method === 'PATCH') {}
if (req.method === 'DELETE') {}
}We need getServerSession to know how if there is a user logged in or not to update a post or create a new post.
Read Post (GET)
To read all posts in the database we can use the findMany query and the where clause to show only published posts.
TSXif (req.method === 'GET') {
try {
const data = await prisma.post.findMany({
where: {
published: true,
},
})
return res.status(200).json(data)
} catch (err) {
return res.status(500).json(err)
}
}Insert Post (POST)
To add a new post we need to check first the user session and use their email to create (INSERT) a new post in the database.
TSXif (req.method === 'POST') {
const { title, content } = req.body
const session = await getServerSession(req, res, authOptions)
if (session) {
try {
const result = await prisma.post.create({
data: {
title,
content,
author: { connect: { email: session?.user?.email } },
},
})
res.json(result)
} catch (err) {
return res.status(500).json(err)
}
} else {
res.status(401).send({ message: 'Unauthorized' })
}
}Update Post (PATCH)
To update post published state we need to send the post id and the current statue with the request and then update the post to be published or not.
TSXif (req.method === 'PATCH') {
const { id, published } = req.body
if (!id || published === '') {
return res.status(401).send({ message: 'Unauthorized' })
}
const session = await getServerSession(req, res, authOptions)
if (session) {
try {
const result = await prisma.post.update({
where: { id },
data: { published: !published },
})
res.json(result)
} catch (err) {
return res.status(500).json(err)
}
} else {
res.status(401).send({ message: 'Unauthorized' })
}
}I'm not updating the title or content of the post here but you can include it here if you want!
Delete Post (DELETE)
TSXif (req.method === 'DELETE') {
const { id } = req.query.id
if (!id) res.status(401).send({ message: 'ID not found' })
const session = await getServerSession(req, res, authOptions)
if (session) {
try {
await prisma.post.delete({
where: { id: Number(id) },
})
res.status(200).send('Delete Post Successfully')
} catch (err) {
return res.status(500).json(err)
}
}
else {
res.status(401).send({ message: 'Unauthorized' })
}
}Home Page
I'm going to use useSWR hook from SWR by Vercel to fetch post data on the client side.
You can use getServerSideProps directly and use the prisma client to query the post data instead of this approach it will look like the approach in the Draft Page in the next sectionInstall SWR
POWERSHELLnpm install swrindex.tsxTSXimport { Post } from "@prisma/client"
import { useSession } from 'next-auth/react'
import Link from 'next/link'
import useSWR, { Fetcher } from 'swr'
const fetcher: Fetcher<any, string> = (...args) =>
fetch(...args).then((res) => res.json())
export default function Home() {
const { data: session } = useSession()
const { data: posts, isLoading, error } = useSWR('/api/post', fetcher)
if (error)
return (
<div className='w-full p-5'>
<h1>No Posts 🥲</h1>
</div>
)
if (isLoading) return <div className='w-full p-5'>Loading...</div>
return (
<div className='w-full p-5'>
{posts.map((post: Post) => (
<div key={post.id} className='py-5 border-b border-teal-400 px-5'>
<h1 className='font-bold text-2xl'>{post.title}</h1>
<p className='text-lg mt-4'>{post.content}</p>
{session?.user && post.authorId === session.user?.id && (
<Link href='/draft' className='btn inline-block mt-4'>
Edit
</Link>
)}
</div>
))}
</div>
)
}User ID is not included in the session so in order to include it we are going to use the session callback function to extend the session and include the user id 👇
pages/api/auth/[...nextauth].tsTSX/* pages/api/auth/[...nextauth].ts */
const prisma = new PrismaClient()
export const authOptions = {
adapter: PrismaAdapter(prisma),
providers: [...],
callbacks: {
async session({ session, user }: { session: Session; user: AdapterUser }) {
session.user.id = user.id
return session
},
},
}Draft Page
draft.tsxTSXimport { GetServerSidePropsContext } from 'next'
import { signIn, useSession } from 'next-auth/react'
import prisma from '../prisma/client'
import Router from 'next/router'
import { Post } from '@prisma/client'
import { authOptions } from './api/auth/[...nextauth]'
import { getServerSession } from 'next-auth'
export async function getServerSideProps({
req,
res,
}: GetServerSidePropsContext) {
const session = await getServerSession(req, res, authOptions)
if (!session) {
return { props: { drafts: [] } }
}
const drafts = await prisma.post.findMany({
where: { author: { email: session.user?.email } },
})
return {
props: {
drafts,
},
}
}
export default function Draft({ drafts }: { drafts: Post[] }) {
const { data: session } = useSession()
if (!session) {
return (
<button className='btn text-lg mx-auto' onClick={() => signIn('google')}>
Sign In to see Drafts
</button>
)
}
async function handlePost(
e: React.SyntheticEvent,
id: number,
published: boolean,
del = false
) {
e.preventDefault()
try {
await fetch(`/api/post${del ? `?id=${id}` : ''}`, {
method: del ? 'DELETE' : 'PATCH',
headers: { 'Content-Type': 'application/json' },
body: del ? '' : JSON.stringify({ id, published }),
})
await Router.push('/draft')
} catch (err) {
console.error(err)
}
}
return (
<div className='p-5 w-full'>
{drafts.map((draft: any) => (
<div
key={draft.title}
className='flex justify-between items-center border-b-2 pb-10 px-5'
>
<div>
<h2 className='text-2xl font-bold text-teal-600 my-4'>
{draft.title}
</h2>
<p>{draft.content}</p>
{!draft.published ? (
<button
onClick={(e) => handlePost(e, draft.id, draft.published)}
className='btn mt-4'
>
Publish
</button>
) : (
<button
onClick={(e) => handlePost(e, draft.id, draft.published)}
className='btn btn-red mt-4'
>
Unpublish
</button>
)}
</div>
<button
onClick={(e) => handlePost(e, draft.id, draft.published, true)}
className='btn btn-red'
>
Delete
</button>
</div>
))}
</div>
)
}Post Page
TSXimport { signIn, useSession } from 'next-auth/react'
import Router from 'next/router'
import { useState } from 'react'
export default function Post() {
const [title, setTitle] = useState('')
const [content, setContent] = useState('')
const { data: session } = useSession()
if (!session) {
return (
<button className='btn mx-auto text-lg' onClick={() => signIn('google')}>
Sign In to create Posts
</button>
)
}
async function handleSubmit(e: React.SyntheticEvent) {
e.preventDefault()
if (!title || !content) return
try {
const body = { title, content }
const post = await fetch(`/api/post`, {
method: 'POST',
headers: { 'Content-Type': 'application/json' },
body: JSON.stringify(body),
})
if (post.ok) await Router.push('/draft')
throw new Error(post.statusText)
} catch (err) {
console.error(err)
}
}
return (
<form
onSubmit={handleSubmit}
className='flex flex-col gap-5 max-w-md w-full mx-auto justify-center'
>
<h1 className='text-xl font-bold text-teal-600 text-center'>
Create New Draft
</h1>
<label htmlFor='title'>Title</label>
<input
value={title}
onChange={(e) => setTitle(e.target.value)}
type='text'
id='title'
autoFocus
required
className='border p-2 text-black'
/>
<label htmlFor='content'>Content</label>
<textarea
value={content}
required
onChange={(e) => setContent(e.target.value)}
id='content'
className='border p-2 text-black'
/>
<button className='btn'>
Add Post
</button>
</form>
)
}Conclusion
We were able to create a Blog using NextJS, NextAuth (User Authentication), and Prisma (Database) 😲
These 3 tools can be used to create a Fullstack projects with secure authentication and database!
NextJS
I have been using NextJS for a while and it does not fail to deliver a great development experience for me to create a production ready application with different types of rendering methods like 👇
- SSR (Server Side Rendering)
- CSR (Client Side Rendering)
- SSG (Static Site Generation)
- ISR (Incremental Static Regeneration)
And the abilities to create custom APIs, Custom Image component, and a bunch of useful, easy-to-use and understand hooks and methods!
NextAuth
NextAuth is probably the easiest way to create authentication for your NextJS application. It is easy to use, flexible, secure and support multiple types of encryption strategies and Database adapters!
NextAuth is transitioning to be a new tool now called Auth.js which is going to be used with different Frameworks other than NextJS like SvelteKit and SolidJS
Prisma
Prisma offers a great development experience to interact with databases and modify them is you like or choose between databases options.
